
1、介绍
探索 Midjourney 和 PS 创成式填充这一王炸组合如何帮助设计师简化复杂流程,创造更多令人震惊的设计作品。借助这两个强大工具,让你的设计炸裂出无尽的可能性,迸发出更多的创意火花。
![图片[1]-PS AI 介绍以及如何安装PS AI - 李又懂-李又懂](https://geek.liyoudong.cn/wp-content/uploads/2024/02/image-581-1024x682.png)
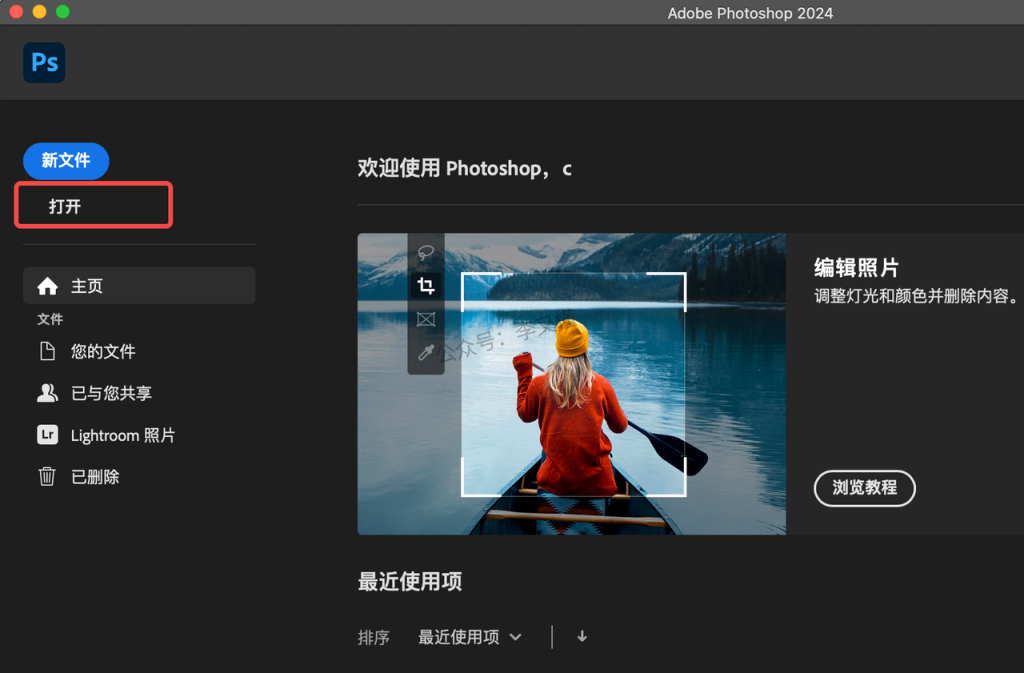
Adobe 最近推出了 Photoshop 2024版,它拥有最炸裂的新 AI 功能,称为“创成式填充”。
它能做什么?创成式填充可以使用简单的文本提示非破坏性地自动添加、扩展或删除图像内容。
以下是你可以使用创成式填充执行的操作的一些示例。
1、创意扩展
Outpainting 创意扩展是裁剪的反义词。它是一种技术,涉及将图像的边界扩展到超出其原始大小或纵横比。
毕业季,为了纪念一把青春,我在 Midjourney 中使用了一个描述词来创建了毕业生穿学士服的照片。
A proud Chinese girl donning a graduation cap and gown, standing in front of an ivy-covered university building with a diploma in hand, rays of sunshine breaking through the trees, her confident and intelligent expression exuding accomplishment, Realistic photography with a Canon EOS R5 and a 24-70mm f/2.8 lens, backlighting to emphasize the girl’s silhouette, –ar 3:2 –v 5.1
![图片[2]-PS AI 介绍以及如何安装PS AI - 李又懂-李又懂](https://geek.liyoudong.cn/wp-content/uploads/2024/02/image-582-1024x682.png)
Photoshop 可以通过单击“生成”按钮自动填充当前图片比例以外的空间……无需提示词。
![图片[3]-PS AI 介绍以及如何安装PS AI - 李又懂-李又懂](https://geek.liyoudong.cn/wp-content/uploads/2024/02/image-583-1024x584.png)
![图片[4]-PS AI 介绍以及如何安装PS AI - 李又懂-李又懂](https://geek.liyoudong.cn/wp-content/uploads/2024/02/image-584-1024x576.png)
2、将 Midjourney 与创成式填充相结合
1)合并两张不同背景的图片
创成式填充的一个令人兴奋的方面是它可以无缝地混合多个图像。
这里有两张我用 Midjourney 生成的机器人街头音乐家图片。
![图片[5]-PS AI 介绍以及如何安装PS AI - 李又懂-李又懂](https://geek.liyoudong.cn/wp-content/uploads/2024/02/image-585-1024x682.png)
![图片[6]-PS AI 介绍以及如何安装PS AI - 李又懂-李又懂](https://geek.liyoudong.cn/wp-content/uploads/2024/02/image-586-1024x682.png)
为了合并这两张图片,我将它们并排放置在 Photoshop 画布上,确保它们的大小大致相同。 你可以看到两张图片的背景非常不同。
![图片[7]-PS AI 介绍以及如何安装PS AI - 李又懂-李又懂](https://geek.liyoudong.cn/wp-content/uploads/2024/02/image-587-1024x584.png)
我选择了中间部分,然后简单地让 Photoshop 合并它们,结果非常顺利。
![图片[8]-PS AI 介绍以及如何安装PS AI - 李又懂-李又懂](https://geek.liyoudong.cn/wp-content/uploads/2024/02/image-588-1024x339.png)
2)添加蒸汽朋克机器人鼓手
但是这个乐队可以使用鼓手,所以我在两个机器人之间选择了一个矩形区域,并提示 Photoshop 创建一个蒸汽朋克机器人鼓手。
![图片[9]-PS AI 介绍以及如何安装PS AI - 李又懂-李又懂](https://geek.liyoudong.cn/wp-content/uploads/2024/02/image-589-1024x239.png)
![图片[10]-PS AI 介绍以及如何安装PS AI - 李又懂-李又懂](https://geek.liyoudong.cn/wp-content/uploads/2024/02/image-590-1024x416.png)
![图片[11]-PS AI 介绍以及如何安装PS AI - 李又懂-李又懂](https://geek.liyoudong.cn/wp-content/uploads/2024/02/image-591-1024x339.png)
你可以提示 Photoshop 生成新的图像内容,它会尝试匹配整个图像的上下文。代替以前版本中的内容识别填充。
2、图像修复
修复图像涉及替换图像中的某个区域或添加新内容,使其与周围环境无缝融合。
这里是我在 Midjourney 生成的一张朋克风的美女图片。其他都很满意,唯独手这一块瑕疵很大,想了各种办法都没搞定,最终还是放弃了。
![图片[12]-PS AI 介绍以及如何安装PS AI - 李又懂-李又懂](https://geek.liyoudong.cn/wp-content/uploads/2024/02/image-592-574x1024.png)
但是,现在有了新版 PS 的创成式填充功能,几秒钟搞定!
![图片[13]-PS AI 介绍以及如何安装PS AI - 李又懂-李又懂](https://geek.liyoudong.cn/wp-content/uploads/2024/02/image-593-1024x458.png)
修复之后的结果,已经非常完美了。
![图片[14]-PS AI 介绍以及如何安装PS AI - 李又懂-李又懂](https://geek.liyoudong.cn/wp-content/uploads/2024/02/image-594-574x1024.png)
我真的不知道PS大神如果用之前的蒙版进行编辑需要多长时间。反正我是没做出来。
4、背景替换
另一个很棒的 AI 功能是能够立即选择图像的主体。 Photoshop 中现在有一个“选择主体”按钮。
![图片[15]-PS AI 介绍以及如何安装PS AI - 李又懂-李又懂](https://geek.liyoudong.cn/wp-content/uploads/2024/02/image-595-1024x584.png)
选择主体后,可以直接删除背景,反转选择并提示新的背景场景。
![图片[16]-PS AI 介绍以及如何安装PS AI - 李又懂-李又懂](https://geek.liyoudong.cn/wp-content/uploads/2024/02/image-596-1024x584.png)
这里我添加了一个海滩背景的提示。
![图片[17]-PS AI 介绍以及如何安装PS AI - 李又懂-李又懂](https://geek.liyoudong.cn/wp-content/uploads/2024/02/image-597-1024x584.png)
狗狗奔跑时动作不自然,添加狗爪子进去。
![图片[18]-PS AI 介绍以及如何安装PS AI - 李又懂-李又懂](https://geek.liyoudong.cn/wp-content/uploads/2024/02/image-598-1024x584.png)
![图片[19]-PS AI 介绍以及如何安装PS AI - 李又懂-李又懂](https://geek.liyoudong.cn/wp-content/uploads/2024/02/image-599-1024x574.png)
2、安装
本文转自教程《AI绘画》,获取全套教程,可关注上方李又懂的公众号,后台回复【AII绘画】免费获取全套教程~
![图片[3]-AI绘画软件常用软件介绍-李又懂](https://liyoudong-1305671160.cos.ap-beijing.myqcloud.com/2024/02/20240204120213298.png)


暂无评论内容